What I’m Working On: January 2021

It’s a new year! So far my craft productivity is way down compared to some of the fall months. Could it have anything to do with caring for a two month old baby? Seems likely. I also decided this year that I am not setting explicit goals. This is a big departure for me, as I typically like to have a lot of goals written down. But I want to explore another way this year, where I just do whatever I want. Of course there are a lot of things in life that must be done, and I’m good at doing the necessities. But aside from those, I want to get back in touch with my own inner voice and, as much as possible, only do things I want to do. There is no need to feel obligated to work on a project. I want to use my limited free time on things that make me happier. So here are the things I’ve been working on this month, which most of the time I did not feel obligated to do.

Quilty Love Cross Stitch

FINISHED – There were moments where I really avoided this one. But I got a burst of desire to finish it right at the end of the month, so I put on the finishing touches of ric rac and buttons just today. And now I can use it with my Valentine’s decorations!

Cityscape Scarf

IN PROGRESS – This scarf has been a lot of fun to make, and I adore the yarn colors. I’m about 3/4 done with the main knitting, then will finish with edging. It is my first experience with intarsia, and it is really not that hard! The squares in the design make for an easy introduction to the technique. The colors change every 12 rows, so I can get in the groove for a little while and then get the next set of colors ready before I get bored. I learned the felted join technique for connecting on new pieces of yarn, and it is a game changer. I am going to have plenty of yarn left over for another project, which I’m already plotting.

Galloway Hat #2

IN PROGRESS – This one is about 75% done. I think there is too much yellow… Maybe I should have chosen the order of colors differently. Oh well!

What I’m Working On: December 2020

I got a surprising amount of crafting done this month, considering we had Christmas and the baby takes lots of attention. I have learned how to knit while holding a sleeping baby, which is a pretty good talent to have!

Forbes Sweater

FINISHED – I finally finished this sweater! In case you haven’t followed my other monthly updates, this is the Forbes Sweater from Brooklyn Tweed, made from Ranch 02 yarn.

Baby Duck Booties

FINISHED – See my post about these booties here.

Burnaby Hat #2

FINISHED – This is another Burnaby Hat knit in bulky weight Brooklyn Tweed Quarry, this time in the Moonstone colorway. I went up a needle size from before, to US 8 and US 10.5, because the recipient has a slightly larger diameter head than the pattern specifies. I also made the ribbing a little longer than the first time. Here’s another picture of the first one, just to show off how good it looks on my sister!

Mitten Ornament

FINISHED – This is from a pattern that Brooklyn Tweed released for free this holiday season. There is no specific gauge or yarn suggestion, and the final size depends on the yarn selection. I made this out of some Quince and Co. Finch yarn (fingering weight) and size US 3 needles. It’s a fast knit that makes great use of small amounts of leftover yarn!

Quilty Love Cross Stitch

IN PROGRESS – I started this last January as part of a cross stitch along that concluded just in time for Valentine’s Day. I obviously didn’t finish in time! I’m hoping to finish by the end of January this year. I just have 1.5 red hearts and one more row of quilt motifs to go, then the finishing details of sewing on buttons and adding the ric rac borders. The pattern and thread kit are available from Fat Quarter Shop.

Rowan Felted Tweed Swatch

FINISHED – I quickly knitted up this swatch of Rowan Felted Tweed in preparation to make the Cityscape Scarf from Modern Daily Knitting’s Field Guide 16. For Christmas, I received a kit of all the suggested yarn colors for this scarf. This yarn is awesome and I can’t wait to get started on the beautiful scarf. The colors!!!

Galloway Hat #2

IN PROGRESS – I have plenty of Peerie yarn left from my first Galloway Hat. This one uses white as the main color, and I went down one size for each needle to make it a little bit smaller. I’ve finished the ribbing and started the first few rounds of colorwork.

What I’m Working On: November 2020

I finished several projects this month. This was mostly because I took a week off of work before the baby was born, and spent most of that time knitting. I think it was my nesting instinct kicking into overdrive!

Easy Baby Hat

FINISHED – Last month I wrote about the Albizia Hat and Mittens from the Quince Quarterly Fall 2020 subscription box, and the modified version of the hat I made for my toddler. I still had a little bit of the wonderful Owl yarn left and wanted to find a way to use it up. I had just enough yarn to make a baby hat. Now both of my kids have hats to match mine! The pattern I improvised is below.

This is all that is left of my 3 skeins of Quince and Co. Owl yarn!

Baby Hat Pattern:
Gauge:  20 sts = 4 in with US 7 needles
Yarn:  Owl by Quince and Co. in Steppe (C1), Allagash (C2), and Abyssinian (C3)
Finished measurements:  About 14″ circumference, and 5″ tall
CO 70 with two-color long-tail cast on. (Here is a description of the cast on, although I only used a single needle.)
Round 1:  Knit with C1, which was on the thumb side for the cast on.
Round 2:  Knit with C2, which was on the finger side for the cast on.
Rounds 3-6:  Work K1, P1 ribbing, alternating C1 and C2 each round.
The remainder of the hat is worked in stockinette stitch (K all stitches).
Rounds 7-15:  *Knit 2 rounds with C1, Knit 1 round with C2, repeat from * 2 more times.
Rounds 16-18:  Knit 2 rounds with C1, Knit 1 round with C3.
Rounds 19-27:  *Knit 2 rounds with C1, Knit 1 round with C2, repeat from * 2 more times.
Round 28 (dec rnd):  With C1, *K3, K2tog, repeat from * (14 sts decreased, 56 sts remain)
Round 29:  With C1, knit
Round 30:  With C3, knit
Round 31 (dec rnd):  With C1, *K2, K2tog, repeat from * (14 sts decreased, 42 sts remain)
Round 32:  With C1, knit
Round 33 (dec rnd):  With C2, *K1, K2tog, repeat from * (14 sts decreased, 28 sts remain)
Round 34:  With C1, knit
Round 35 (dec rnd):  With C1, *K2tog, repeat from * (14 sts decreased, 14 sts remain)
Round 36 (dec rnd):  With C1, *K2tog, repeat from * (7 sts decreased, 7 sts remain)
Break yarn, thread through remaining 7 sts and cinch closed, weave in ends.

Galloway Hat

Galloway Hat, blocking on a balloon

FINISHED – I swatched twice for this! I had to go up a needle size from the pattern recommendation to make gauge. I love the pattern…it is a beautiful 4-color stranded colorwork hat in fingering yarn (Brooklyn Tweed Peerie). I suspect I will be making more than one of these, especially because there is plenty of yarn left!

Forbes Sweater

IN PROGRESS – I’m nearing the finish line on this pullover! Since last month, I joined the sleeves to the body and started working the circular yoke. I’m 70% done with the yoke pattern, which uses simple combinations of knit and purl stitches to create a textured design.

Burnaby Hat

FINISHED – This is a quick knit using chunky Brooklyn Tweed Quarry yarn. The pattern includes instructions for both chunky yarn and DK yarn, so it’s a nice one to have in my library.

Urtia Hat

IN PROGRESS – I already made one of these, but it ended up too big, likely since I didn’t do a real gauge swatch. I started over with smaller needles and so far it seems like a better fit. The pattern uses a simple half brioche rib stitch to make a cozy fabric. I’m using Brooklyn Tweed’s Dapple yarn, a blend of cotton and wool that they released this summer.

Baby Sweater

FINISHED – This is another item that I made pretty quickly. I started it 2 days before the baby was born and even worked on it a little bit in the hospital! It is worked top down with raglan sleeve shaping and a garter stitch border worked in the round. It is based on this pattern, with significant modifications.

Christmas Stocking

FINISHED – I stitched the name and did the finishing sewing during nap times. I’m so glad I got this done just in time to decorate for Christmas! (Note: I prefer to keep my kids anonymous online, so that’s why the name is blurred.)

Reading Materials

I read two books related to knitting: A Stash of One’s Own by Clara Parkes, and The Knit Vibe by Vickie Howell. I’ve also been keeping up with Modern Daily Knitting, and ordered myself a few gifts from their store!

What I’m Working On: October 2020

Cross-stitch Christmas Stocking

IN PROGRESS – This is as done as it can be until the baby comes! By mid-October, I had finished everything except stitching the name and the final construction. It didn’t take as long as I expected – only about 3 months. It required really buckling down and focusing on it, though!

Albizia Hat and Mittens

FINISHED – This is the Quince Quarterly Fall 2020 project that I wrote about here.

After completing the Albizia hat and mittens, I had enough yarn leftover to make a toddler hat (left in above picture). I adapted the pattern to make it a little smaller than the original hat, and to account for having very little of the oatmeal-colored yarn left. I cast on 5 fewer stitches to shrink the diameter and worked about 8 fewer rounds. The pattern has 3 colorwork charts to make up the full pattern. I worked the first and last chart as written, and for the middle section I took inspiration from the second chart. I like how the toddler hat turned out, and I’m glad I made it right away while I still remembered my gauge for this pattern and yarn. I still have a little bit of the blue and yellow yarn, so maybe I’ll whip up a tiny baby hat, too!

Forbes Sweater

IN PROGRESS – I finished the main stockinette body and both sleeves. The next step is to join the sleeves with the body, then work the circular yoke, which has a charted pattern. I’m excited for this step, as I’ve never made a circular yoke sweater before.

Kahawai Cowl

FINISHED – This is the Kahawai Cowl from the Darn Good Yarn subscription box.

Some Not-So-Recent Cross-Stitch Projects

When I was a kid, my mom made several beautiful, complex cross-stitch projects. I saw her working on these, and eventually I wanted to try. I don’t remember what I started with, but I got into making very small projects, like candy cane Christmas ornaments and tiny wall decorations. These were fast to make and fun to give as gifts. It had been years, though, since I did any cross-stitch projects at all.

Then a few years ago (maybe 2016?) I got the cross-stitch bug again. I saw a cute owl cross-stitch kit at a craft store and decided to pick it up. It was during a Christmas vacation when I had plenty of time to work on crafts, so I finished it pretty quickly. It helped that the design was simple, with contiguous blocks of color and no backstitching, and only 4″x6″ overall dimensions.

The owl picture lives in my closet on the dresser, where it brightens my day whenever I see it. I love bright colors, and this has plenty of them. I also like the rustic look of the canvas background. In the past I had typically done projects that used white canvas, so this was a fun change.

Right away, I bought another kit, this time a Halloween design. I worked on it for a week or two, and then just stashed it away for a couple years. I finally picked it back up last fall, determined to have it completed by Halloween. I just barely made it in time! I think I completed it with about a week to spare, so it wasn’t part of my decorations for long. But this year, it has been on display since October 1, so we’ll get to enjoy it all month!

Like the owl, this design has big blocks of color that worked up relatively quickly. However, it took a surprisingly long time to fill in the whole black background. I like the way the backstitch orange stars break up the background with pops of color. The finished dimensions are about 5″x7″.

After completing the Halloween picture, I had good momentum for cross-stitching, so I started working on yet another kit. During the month of November 2019, I made a whole Christmas picture, which was more complex than my other recent projects. Each of the ornaments required several color changes. It may be hard to tell from the picture, but the center of each ornament is in lighter colors, while the edges are darker colors.

This kit is from thestitchery.com, a great resource for cross-stitch and related needle arts. (They have some really lovely kits for table runners that I aspire to make in the future.) The finished dimensions are 12″x5″, which is not a standard frame size. I ended up buying a custom frame and mat from https://www.matboardandmore.com/. They have many colors and options to choose from, and I am really happy with the result.

I have really enjoyed getting back into cross-stitch. It is definitely a tedious hobby, with some bigger projects taking several months to complete even when I’m making daily progress. When they are done, it really boosts my happiness to have cute decorations that I made myself, especially when they are holiday-themed and part of my annual decorating process. I intend to make more for other holidays (Thanksgiving, Valentine’s Day, etc.) Stay tuned for more completed cross-stitch projects in future posts!

What I’m Working On: September 2020

Cross-stitch Christmas Stocking

This stocking is for the new baby, and it comes from a Dimensions cross-stitch kit. I started working on it in July and I’m about 70% done. I’m hoping to finish before the baby comes in November (except for the name, since we haven’t chosen yet)! It would be fun to have everyone’s stockings up for Christmas this year.

Forbes Sweater

It’s been a while since I made a large item like a sweater, since I tend to prioritize accessories that fit well even if my gauge is a little off. I’m currently obsessed with Brooklyn Tweed yarns and patterns, and I thought the Forbes Sweater looked perfect for late fall, when I’m hoping to have it finished. It uses the limited-run Brooklyn Tweed yarn Ranch 02 in color Natural. I’m around 10% done so far.

Cowl

This cowl is from Darn Good Yarns subscription box earlier this year. The pattern is the Kahawai Cowl by Ellen Bergmann, and the yarn is Lace Weight Silk in color Sparkle Sandy Beach from DGY. I’ve been working on it off and on since around April. It is finally almost finished: the last step is to seam the two ends together. I just need to find a half hour or so to finish it up.

Planning

As I mentioned in my last post, I’ve been planning more projects and ordering all the supplies. Just last night, I ordered some fingering weight yarn and a pattern for a colorwork hat for my husband. I know it’s going to be hard to keep up with all these projects once the baby comes, but I’ll get to them all eventually.

Easy Eye Pillow

Today I made an eye pillow to use in yoga or general relaxation. It’s a really easy project to sew, and takes less than an hour from start to finish. To make one, you’ll need a piece of cotton fabric approximately 10″x10″ square, about 3/4 lb. dry lentils for the filling, and a small amount of dried lavender (I used about 1 g) for a nice bit of aromatherapy. You can use something else for the filling besides lentils – small beans or rice would work well. You could experiment with different types of dried herbs if you don’t like lavender or don’t have it on hand, or leave the scent out completely.

Start by cutting your fabric into a 10″x10″ square if you haven’t already.

IMG_0527

Fold the fabric in half horizontally with the wrong side out and press flat. Sew across one short side and the long side, using 1/2″ seam allowances. Continue the long side seam onto the second short side for about an inch, then cut the thread. Starting from the opposite corner of this short side, sew towards the center for 1.5″, again with 1/2″ seam allowance. You will be left with an opening about 2.5″ long. (Leaving the opening in the center rather than at a corner makes it easier to make nice corners and to fold the raw edges under for finishing.) It may be difficult to see, but the opening is on the right side in the picture below.

IMG_0528

Trim the fabric at a 45 degree angle across the corners, close to the seams but taking care not to cut them. Neaten the raw edges together by sewing with a zigzag stitch and overcasting foot on the corners, the left edge, and the long edge, making sure to leave the opening alone.

IMG_0532

Here’s a close-up view of a finished edge:

IMG_0534

Turn the pillow inside out and press flat with the raw edges of the opening turned under so they are ready to be stitched. Using a funnel if you have one, alternately pour in a little pinch of lavender and about 1/4 cup of lentils. Keep going until the pillow is about 2/3 full. You want to make sure there is room for the filling to move around and conform to your face, so don’t overfill.

IMG_0538

Quickly baste the opening together by hand. Move the filling out of the way and carefully topstitch along the entire edge to close. If you want it to look uniform, you could topstitch all the way around all four edges, using a decorative topstitch if you like.

IMG_0542

Remove the basting stitches, trim any loose threads, and your pillow is ready to use. Enjoy the relaxing weight of the pillow on your eyes, and take pride that you made it!

IMG_0544

IMG_0547

Relaxing!

Pillow Covers with Zippers and Piping

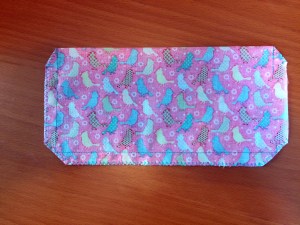
Today’s post is a set of pillow covers I made for two brown pillows that used to live on our old futon, but clash rather hideously with the black couch we have now – meaning that they have been hiding out in a closet for a while.

IMG_0494

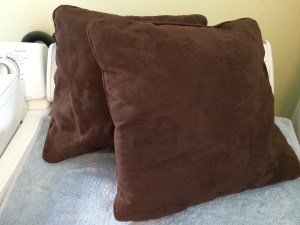
Poor, neglected pillows

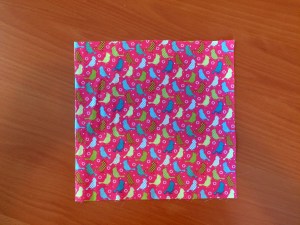
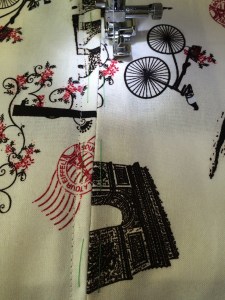
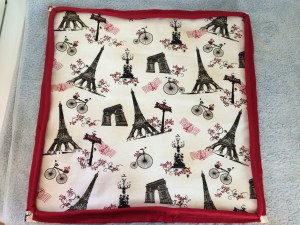
When I was shopping for fabric for my apron, I found some super cute Paris-themed fabric, and had to buy it. (I have studied French since 7th grade and finally had the opportunity to go to Paris last December, so this is definitely in character for me.) I wasn’t sure I wanted to use it for clothing, but realized this would be the perfect way to dress up the couch and breathe new life into the forgotten pillows.

To make the pillow covers, I used the instructions for project 5 in Sewing Machine Basics, by Jane Bolsover. This is an incredible book packed with great information on all kinds of machine sewing techniques. I’ll definitely have to write a whole post about it and its companion, Sewing School Basics, once I’ve had a chance to try a few more projects from them. So far I can enthusiastically recommend them!

The supplies I used for this project included about 2 yd of main fabric, 1 yd of contrast fabric, 6 yd of cotton piping cord, two 14″ zippers, and matching thread. I used the general purpose foot, the overcasting foot, and the zipper foot on my sewing machine.

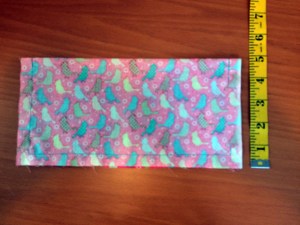
The first step was to measure the pillows to identify how much fabric was necessary. I found that my pillows were 16″ per edge (square), but I actually needed 18″ of fabric (plus 5/8″ seam allowances) to account for the pillow thickness. I made pattern pieces out of old tissue paper, ending up with a 19-1/4″ x 19-1/4″ square for the front and a 19-1/4″ x 10-1/4″ rectangle to make two back pieces connected by a zipper. With these lovely homemade patterns I cut out enough fabric for both pillows.

I installed the zippers into the back pieces using the centered zipper method. I machine basted the two back pieces together to make a seam along the center back, then pressed the seams open.

IMG_0464

Awaiting zipper installation

I neatened the raw edges of this seam using my overcasting foot and a zigzag stitch. With the overcasting foot, you place the raw edge right up against the little guide of the foot so that the zigzag stitch captures the edge. This is a technique that I learned from Sewing Machine Basics, and I’m a little sad I didn’t know about it when I was making earlier projects. It prevents the raw edges from fraying and adds a professional touch. It definitely adds time to a project, but in my opinion it is so worth it.
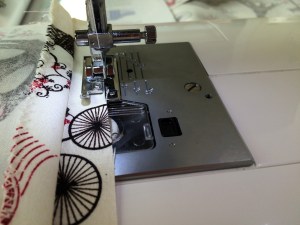
IMG_0463

Overcasting FTW!

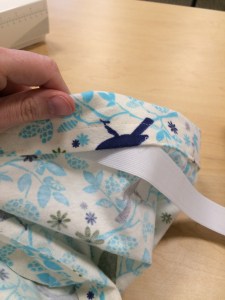
Next I basted the zipper into place by hand so that it was equidistant from the edges and so that  it would open right in line with the seam I had just basted. I used my zipper foot to secure the zipper all the way around. To finish the zipper, I removed the (green) basting stitches from the zipper, then carefully removed the basting stitches that made the central seam. The back pieces were ready to go with working zippers.

IMG_0468

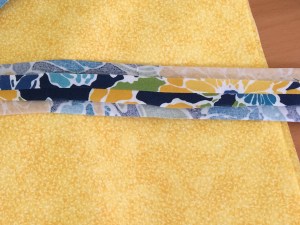
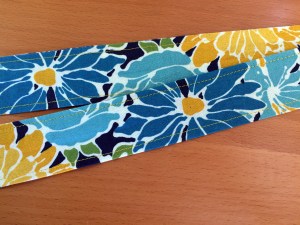
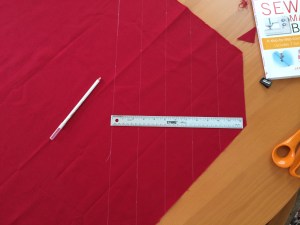
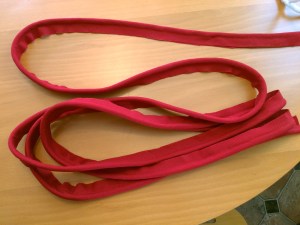
Now it was time to make the red piping, which was the most time-consuming part of this project. The basic idea of making piping is encasing cotton piping cord in the fabric of your choice. I used 3/8″ piping cord for the pillow covers, which I believe is the same as size #5. The fabric strips used for the piping were cut on the bias (like bias tape), which means at 45 degrees to the main selvage of the fabric. Based on the piping cord diameter and desired seam allowances of 5/8″, each strip was 2.5″ wide. I found it helpful to draw the lines using chalk pencil before cutting – otherwise I’m sure it would have been impossible to stay at 45 degrees.

IMG_0478

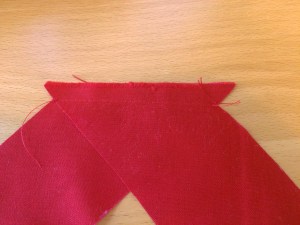
To make one long, continuous strip, I sewed strips end to end along the diagonal ends with 3/8″ seams. Then I pressed the seams and trimmed the corners that extended over the edges. This step took a little trial and error to get the alignment correct, but turned out pretty well.

IMG_0480 IMG_0481 IMG_0482

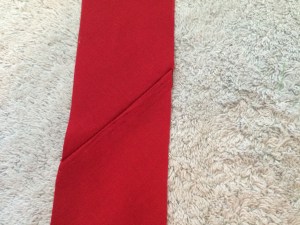
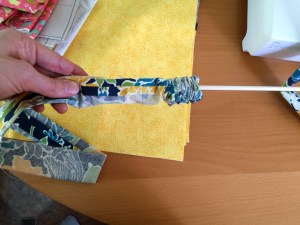
To assemble the piping, I placed the piping cord inside the long bias strip with the right side out and used the zipper foot to sew as close as possible to the piping cord. This part was really tedious because I had to keep stopping to adjust the cord and make sure the raw edges were staying aligned. Does anyone have any tips to make this easier? I ended up with about 12 ft of piping in this lovely red accent color, ready to attach to the pillow covers.

IMG_0485 IMG_0486

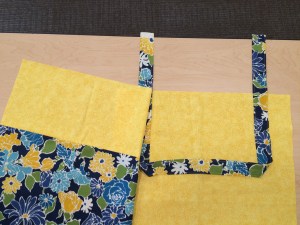
I temporarily attached the piping to the right side of the front piece by lining up all the raw edges and basting the piping into place. To help the piping turn the corners, I cut out notches in the seam allowances at each corner. I made sure the place where the piping joined was at the bottom.

IMG_0488

To finish assembling the pillow cover, I put the back piece on top of the front piece + piping with right sides facing (making sure to open the zipper first!), basted all the pieces together, and seamed all the way around as close as possible to the piping. Then I painstakingly removed all the basting and neatened the edges all together with the overcasting foot.

IMG_0490

All pieces basted together

IMG_0491

After seaming, removing basting, and neatening

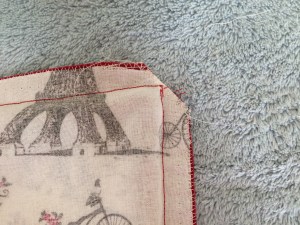
To make the seams less bulky at the corners, I trimmed each corner at 45 degrees right next to the seams and neatened those edges too. Then I turned the pillow covers right side out and marveled at how well they turned out!

IMG_0493 IMG_0495

Finally, I stuffed the old brown pillows into the new covers and dressed up my couch with my awesome new pillows.

IMG_0518

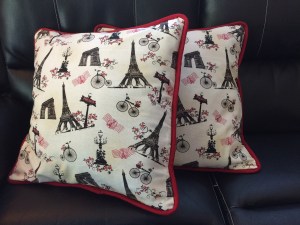
In total, it took me about nine hours to make these pillow covers, and about half of that was making the piping. I definitely think the piping was worth doing though; it adds  a nice contrast and makes the result look much more professional. I’m excited to have a slightly classier looking couch, pleased that I breathed new life into pillows that weren’t being used for anything, and enjoying the daily reminder of the wonderful memories of my trip to Paris.

Lined Tote Bag

This project is a simple tote bag with two different fabrics on the outside and a single-fabric lining. It only took a couple hours and I’m sure would be faster if I made another one. I chose bright, summery fabrics for this project:  yellow, blue, and white flowers on a navy blue background for the main color, and yellow with subtle little white leaves for the contrast color and the lining.

I originally planned to make the straps out of cotton webbing as the pattern called for, but soon decided that the tote bag would look more integrated and well-designed if I sewed the straps from the main flowered fabric. The process was similar to making the straps for the apron, with the addition of topstitching accents. After cutting two strips of fabric that were 4″ wide and 44″ long, I sewed each strip together with right sides facing and 1/2″ seam allowances, then pressed the seams open.

IMG_0372

Next, I put a safety pin on the end of each tube and used a wooden dowel to turn the tubes right side out. I pressed the straps flat with the seam along one edge (rather than in the center as it is in the picture above).

IMG_0375 IMG_0377

To finish the straps, I topstitched about 3/16″ from each edge with a contrasting yellow thread. The finished width of the straps was 1.5″ and at this point they were extra long.

IMG_0379

Now that the straps were complete, it was time to assemble the bag. To make the outer panels, I simply sewed one straight seam per side to attach the smaller yellow pieces to the flowered pieces, then pressed the seams open. It wasn’t clear to me yet why the pattern included the notches at the bottom.

IMG_0432

Next I attached the straps to the lining and the outer panel of each half of the bag by sewing across the top and sides with right sides facing and the strap sandwiched between the two layers. I didn’t keep the straps as long as they started, but adjusted the length so the bag would hang comfortably, then simply cut off the excess length after sewing.

IMG_0430 IMG_0431

I turned each half of the bag right side out, placed the outside faces together, then sewed the sides and bottom edges, leaving the notched cutouts unseamed. (I still didn’t understand how these were going to work!)

IMG_0435

Finally, I learned why the notches were there:  they were designed to make the bottom of the bag sit flat. To achieve this, I had to simply line up the two cut edges of each notch and sew straight across on the lining side.

IMG_0436

After a quick line of topstitching around the top edge for strength, the tote bag was complete and ready to carry all my knitting projects!

IMG_0437

Flannel Pajama Pants

IMG_0409

For my second project with my new sewing machine, I made myself some flannel pajama pants using Simplicity pattern 2819. I found cute flannel fabric with a bird motif – I’m really into birds lately! – and got to work with the help of my sewing class instructor.

The layout of the pajama pants was straightforward, consisting of two front pieces and two back pieces. Immediately after cutting the back pieces, I realized that I had placed the pattern upside down, so the birds on the front would be facing the right way, but the birds on the back would be upside down. And I definitely didn’t have enough fabric left to cut the back pieces again. Oops. Undeterred, I forged ahead with the project, figuring that no one would really notice the back of these pants anyway. I mean, these are for sleeping and lounging around the house!

IMG_0360

Hem for bottom of legs

The first bit of sewing was to create the outer leg seams, sewing the left front to the left back and the right front to the right back. Then on each leg I made the bottom hem by folding the edge up about 1″ and pressing, folding the edge up 1″ again and pressing, and sewing a straight seam close to the fold. I think that’s the first hem I’ve turned!

IMG_0344

Preliminary hem for waist

IMG_0349

Ready to sew inner leg seams

I made a preliminary 1″ hem on the other edge for the waist, only folding it up once this time since there would be more finishing later. Then I sewed both inner leg seams to create tubes. They were starting to look like legs, but not quite pants just yet.

IMG_0370

Ready to join left and right legs

Next came the fun part – finally connecting the two legs! I kept one leg inside out and turned the other one right side out, then stuffed one inside the other so the right sides were together. Once the center edges were aligned, all it took was one simple seam from front to back to join the two legs.

IMG_0371

Threading in the elastic

The last step was to finish the waistband. I folded over the waist edge by about 1 1/4″, enough to hold 1″ wide elastic with a bit of room, then sewed close to the edge around the waist, leaving a 2″ opening to insert the elastic. I measured enough elastic to fit around my waist snugly, then threaded it into the waistband casing. I double-checked the fit and securely stitched the ends of the elastic together. Finally, I sewed across the 2″ opening to close the waistband, and the pants were ready to wear!

IMG_0408

Loving my new pants!

This was a very simple pattern to work with, and I would definitely make these pants again. Next time I think I’ll go for lightweight cotton for summer, and of course I’ll pay closer attention to the orientation of the pattern pieces before cutting my fabric. A couple minor things I might try are making the legs just a bit longer and adding a drawstring.