Lined Tote Bag

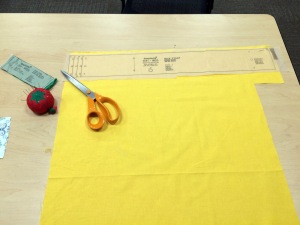
This project is a simple tote bag with two different fabrics on the outside and a single-fabric lining. It only took a couple hours and I’m sure would be faster if I made another one. I chose bright, summery fabrics for this project:  yellow, blue, and white flowers on a navy blue background for the main color, and yellow with subtle little white leaves for the contrast color and the lining.

I originally planned to make the straps out of cotton webbing as the pattern called for, but soon decided that the tote bag would look more integrated and well-designed if I sewed the straps from the main flowered fabric. The process was similar to making the straps for the apron, with the addition of topstitching accents. After cutting two strips of fabric that were 4″ wide and 44″ long, I sewed each strip together with right sides facing and 1/2″ seam allowances, then pressed the seams open.

IMG_0372

Next, I put a safety pin on the end of each tube and used a wooden dowel to turn the tubes right side out. I pressed the straps flat with the seam along one edge (rather than in the center as it is in the picture above).

IMG_0375 IMG_0377

To finish the straps, I topstitched about 3/16″ from each edge with a contrasting yellow thread. The finished width of the straps was 1.5″ and at this point they were extra long.

IMG_0379

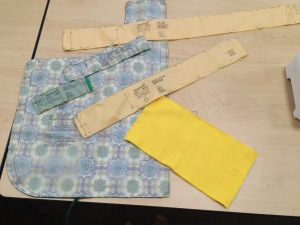
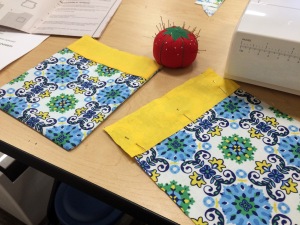
Now that the straps were complete, it was time to assemble the bag. To make the outer panels, I simply sewed one straight seam per side to attach the smaller yellow pieces to the flowered pieces, then pressed the seams open. It wasn’t clear to me yet why the pattern included the notches at the bottom.

IMG_0432

Next I attached the straps to the lining and the outer panel of each half of the bag by sewing across the top and sides with right sides facing and the strap sandwiched between the two layers. I didn’t keep the straps as long as they started, but adjusted the length so the bag would hang comfortably, then simply cut off the excess length after sewing.

IMG_0430 IMG_0431

I turned each half of the bag right side out, placed the outside faces together, then sewed the sides and bottom edges, leaving the notched cutouts unseamed. (I still didn’t understand how these were going to work!)

IMG_0435

Finally, I learned why the notches were there:  they were designed to make the bottom of the bag sit flat. To achieve this, I had to simply line up the two cut edges of each notch and sew straight across on the lining side.

IMG_0436

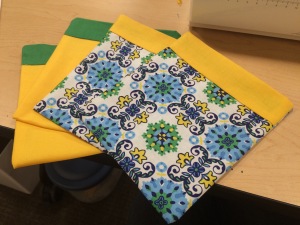
After a quick line of topstitching around the top edge for strength, the tote bag was complete and ready to carry all my knitting projects!

IMG_0437

Inventory #5 – May

My goal for May was to knit up at least 300 g of yarn. I ended up only using 220 g, but 35 g of that was lace yarn, so I actually made quite a lot of stitches! I completed four distinct projects this month – no multiples of one item this time.

First, I made one more Plait Headband using 30 g of pink Malabrigo worsted merino. This was the wide version, which is designed to cover the ears for cold weather. I made it a little shorter than the other wide headbands I made last month, simply because I ran out of yarn.

IMG_0508 IMG_0506

The next project used up another colorway of Malabrigo worsted, dark blue. I made a Foliage Hat by Emilee Mooney, of which I had made a couple a few years ago and really enjoyed. This one turned out quite a bit bigger than the other two. I’m not sure what happened, since I used the same yarn and needles – maybe my knitting has gotten looser? Anyway, it’s still a reasonable size for my head and would also fit someone with a larger head.

IMG_0501 IMG_0505

Project #3 used yet more worsted Malabrigo, this time the Rios line in a purple and green multi colorway. A cowl is a great way to use up a whole skein of Malabrigo, and for this project I chose the Very Braidy Cowl by Maryse Roudier. It was a pretty quick knit with cool 16-stitch cables. A slight word of caution:  I misread the pattern while I was working the first few repeats, putting a few too many rows between the cable rows. pattern said to “repeat rows 5-24“, which I misread as “repeat rows 1-24“. I think the pattern would be more clear if it just said to repeat rows 1-20 instead. Anyway, it didn’t make too much difference to the final product.

IMG_0499 IMG_0500

Finally, I spent most of the month working on the Good Day Sunshine Shawlette by Amanda Bjørge, using 35 g of red Lorna’s Laces Helen’s Lace (also used for my wedding shawl). This was a fun project because I learned some Estonian gathered stitches, including “3 into 3”, which means k3tog, keep stitches on L needle, yo, k3tog the same 3 stitches again. These kind of stitches make a thick, cozy fabric, which is a nice change of pace in a lace piece. I also tried cable stitches without a cable needle, and it worked really well on the little 2-stitch cables for this pattern. I’m eager to try it on larger cables. Unfortunately, the shawl ended up way smaller than I expected and did not use up all the remaining yarn…turns out it’s important to check your gauge! I used the recommended needle and I guess my knitting is tighter than the designer’s. I’m still happy with the result, as it’s a small size that just adds a bit of color without getting in the way. Is it just me, or does the combination of the shape and color remind you of a phoenix?

IMG_0475 IMG_0509

Almost 20% done! That’s an average of about 250 g per month since February – not as much as I had hoped for, but not too shabby. At this rate I will finish in September 2016…

Year-to-Date Statistics
  • 66 different yarns remaining
  • 4085 g remaining (81.7%)
  • 15 projects completed in 2015

Flannel Pajama Pants

IMG_0409

For my second project with my new sewing machine, I made myself some flannel pajama pants using Simplicity pattern 2819. I found cute flannel fabric with a bird motif – I’m really into birds lately! – and got to work with the help of my sewing class instructor.

The layout of the pajama pants was straightforward, consisting of two front pieces and two back pieces. Immediately after cutting the back pieces, I realized that I had placed the pattern upside down, so the birds on the front would be facing the right way, but the birds on the back would be upside down. And I definitely didn’t have enough fabric left to cut the back pieces again. Oops. Undeterred, I forged ahead with the project, figuring that no one would really notice the back of these pants anyway. I mean, these are for sleeping and lounging around the house!

IMG_0360

Hem for bottom of legs

The first bit of sewing was to create the outer leg seams, sewing the left front to the left back and the right front to the right back. Then on each leg I made the bottom hem by folding the edge up about 1″ and pressing, folding the edge up 1″ again and pressing, and sewing a straight seam close to the fold. I think that’s the first hem I’ve turned!

IMG_0344

Preliminary hem for waist

IMG_0349

Ready to sew inner leg seams

I made a preliminary 1″ hem on the other edge for the waist, only folding it up once this time since there would be more finishing later. Then I sewed both inner leg seams to create tubes. They were starting to look like legs, but not quite pants just yet.

IMG_0370

Ready to join left and right legs

Next came the fun part – finally connecting the two legs! I kept one leg inside out and turned the other one right side out, then stuffed one inside the other so the right sides were together. Once the center edges were aligned, all it took was one simple seam from front to back to join the two legs.

IMG_0371

Threading in the elastic

The last step was to finish the waistband. I folded over the waist edge by about 1 1/4″, enough to hold 1″ wide elastic with a bit of room, then sewed close to the edge around the waist, leaving a 2″ opening to insert the elastic. I measured enough elastic to fit around my waist snugly, then threaded it into the waistband casing. I double-checked the fit and securely stitched the ends of the elastic together. Finally, I sewed across the 2″ opening to close the waistband, and the pants were ready to wear!

IMG_0408

Loving my new pants!

This was a very simple pattern to work with, and I would definitely make these pants again. Next time I think I’ll go for lightweight cotton for summer, and of course I’ll pay closer attention to the orientation of the pattern pieces before cutting my fabric. A couple minor things I might try are making the legs just a bit longer and adding a drawstring.

Reversible Apron

For our anniversary last year, my husband bought me a beautiful new sewing machine (Singer Quantum Stylist 9960). I was so excited to start whipping up all kinds of clothes on the new machine, except then I realized that I didn’t really know how to sew. I mean, I can fix a hem and hand sew buttons, but the last time I made anything more complicated than that was a little letter Z pillow I sewed in 7th grade. (Letter Z – because I like to sleep…Zzzz…) So anyway, I’m basically a beginner.

IMG_1736

My amazing sewing machine

Fortunately, there was a beginning sewing class offered through the local recreation department during the month of March. I jumped on the opportunity to have someone walk me through a simple sewing project, and this class did not disappoint. Over the course of four sessions, we learned how to read a pattern, lay out and pin the pattern, cut out the pattern pieces, sew plain seams with proper seam allowance, turn narrow strips, design custom-sized pockets, and basic topstitching, all while creating a reversible apron.

The pattern we used in the class is the Simplicity 2691 apron pattern. The apron has a fixed-length neck strap, long waist ties, and one pocket on each side. The pockets and apron front have contrasting top bands.

IMG_0296

Laying out the neck strap

The first step was to lay out and pin the pattern pieces to the fabric. I selected three cotton fabrics for the apron:  green, yellow, and a green/yellow/white/blue multi pattern. This part took a really long time because I found it difficult to make sure the fabric stayed flat and smooth while I pinned the pattern to it. Also I’m a bit of a perfectionist, so that may have had something to do with it.

IMG_0297

Most of the pieces are cut out

Next I cut out all the pieces. I chose to make the main body of the apron in the multi pattern fabric on one side and the green fabric on the other, with yellow contrast on both sides. This part is pretty fun, because the feeling of cutting fabric with a really nice pair of fabric scissors is just satisfying. (Is that just me?) As a side note, I bought my scissors several years ago at Jo-Ann Fabrics with a 50% off coupon, so I splurged on a really nice pair, and it was totally worth it.

The first pieces I sewed were the neck strap and waist ties, which I made of the contrasting yellow fabric. These were pretty simple:  fold in half and sew around one end and the long edge, then turn inside out using a long dowel.

After the ties came the pockets. This was the one place where my teacher encouraged us to ditch the pattern and try making our own pockets. I opted for medium rectangular pockets, where the pattern had smaller pockets with rounded corners (which I assumed would be harder to sew). My pockets were designed to be double-thick, so I simply cut a rectangle of fabric that was the desired width and about twice the desired length.

IMG_0316

Getting ready to attach the pocket band

To sew each pocket, I first attached the pocket band by pinning the right sides together and simply sewing straight across the edge. Then I pressed the seam I just created toward the top of the pocket. I folded the long rectangular pocket piece in half with the right side in, then sewed around the two sides (the bottom was just a fold). Finally, I folded in and pressed the top edges (both front and back) and sewed a topstitch across. The pockets were now double-layered closed rectangles.

IMG_0317

Four finished pockets

The rest of the sewing went pretty fast. I stitched the pockets directly to each apron front with a topstitch around the two sides and the bottom of the pockets. I attached the top apron bands in the same way as the pocket bands. I pinned the two right sides of the apron together, inserting the ties and neck strap into proper position. I carefully sewed all the way around the edges of the main apron pieces, making sure that the ties and neck strap were correctly stitched into place and leaving the top edge open. Then I turned the apron right side out and folded under and pressed the top edges of the apron bands. Finally, I topstitched all the way around the edge of the apron, then did a final press. Here is the finished product:

IMG_0337    IMG_0341

I’m pretty happy with the way it turned out, especially for being the hardest sewing project I’ve done to date (sorry, Z pillow!) I was a little disappointed with how large the apron turned out, since I followed the size guide on the pattern in choosing which size to make. But it works just fine with the waist straps wrapped around in front like in the pictures. Also, my topstitching could use some serious work. The spacing from the edge is inconsistent and sometimes pretty wavy. Things to work on in my next project! Overall, I am proud that I made a cute, functional apron.

Inventory #3 – March

Although I haven’t been very good about posting this month, I have made some significant progress on my stash challenge! I’m deep in the serious part of writing my dissertation, so it’s been wonderful to spend time knitting in the evenings to relax and rest my mind. This month I completed three projects and put a dent in a fourth larger project. I used up 300 g of yarn on these projects, or 6% of the starting total (5000 g) – not too bad for one month! Now I’m on a pace to finish my stash challenge in about a year and a half, which is far more respectable than last month. So, what did I make in March?

First, I made a multicolored farmer’s market bag from the Hexagonal Market Bag pattern. I used Lily Sugar’n Cream yarn, a nice multipurpose cotton yarn. The bag took 60 g of yellow and 90 g of blue/yellow/white. I modified the pattern ever so slightly in the last step:  instead of using a three-needle bind-off to join the strap to the rim of the bag, I used grafting for ribbing. This technique is pretty similar to standard grafting with kitchener stitch, but instead of working all the stitches in order, you separate the knit and purl stitches onto two needles, work all the knit stitches, turn, and work all the remaining stitches, which now look like knit stitches. I really prefer the look of the grafted join, since it looks identical to the opposite end of the strap. The bag became a gift for my mom.

IMG_0322

Completed project #1

Next, I got to work on using up some of the Malabrigo merino worsted I have left from numerous other projects. I made the Bloom Couture Headband by Melissa Monday with some green Malabrigo. It only took 15 g to make the whole headband, so I’m thinking this is a great way to use up little bits. Plus the awesome colorways that the Malabrigo comes in mean the headbands really add a pop of color!

IMG_0327

Completed project #2

I also made some more progress on the heart baby blanket I showed last month. I used 115 g of Red Heart Classic Soft yarn in orange, finishing off my current ball. Right now the blanket is about 56% finished, so hopefully I’ll have it done by the end of next month.

IMG_0328

In progress and getting bigger!

Finally, I decided I was tired of knitting other people’s designs and it was time to design my own headband. I came up with this plaited headband design, which I’ll write a full pattern post for in the near future (I’m still working out some of the details to make it clear and complete). This headband used 20 g of purple Malabrigo merino worsted. I’m really proud of the way it turned out, and I can’t wait to make more headbands and share the pattern with you all!

IMG_0326

Completed project #3

Year-to-Date Statistics:

  • 69 different yarns remaining
  • 4665 g remaining (93.3%)
  • 4 projects completed in 2015

Reine Cardigan

To go along with my stash challenge, a mini-resolution I have for myself this year is to actually finish my projects. I know, what a revolutionary idea! I have this problem where I LOVE to start new projects, to learn new stitches and techniques, and generally spend a lot of time knitting. But when it comes time to put the finishing touches on, my interest plummets. I just do not find it very fun to weave in ends, seam pieces together, block, or sew on buttons. These things are crucial, though! Blocking is critical for determining the final shape and size and for getting the fabric to lay correctly. Seams and buttons can add a great degree of visual interest, in addition to their obvious functions. So it’s time for me to get over my aversion to finishing.

Today I am happy to report that I have a finished cardigan to share with you. All of the knitting for this piece took place in 2014 – in fact, it has been about a year since I started the project. As usual, I procrastinated the less fun parts, which included sewing on pockets and buttons. But I felt a huge sense of accomplishment yesterday as I sewed on the last button.

_MG_4556

The pattern for this cardigan is Reine by Alexis Winslow, from the Brooklyn Tweed collection Wool People 3. (By the way, have I mentioned how much I love Brooklyn Tweed’s patterns? Always so good.) I was struck by the details of the design – particularly the garter stitch accents on the shoulders, sleeves, and hem, and the double-sided cable that lines the front edge, collar, and pockets. I used a soft lavender alpaca yarn – Galler Yarns Prime Alpaca Heathers.

_MG_4561

Garter stitch accents

I always like to learn new techniques, and this project gave me a few opportunities to do so. First, the double-sided cable was a fun change from the standard cables I’ve been accustomed to, and it’s pretty easy. Rather than knitting all the stitches in the cable section with cable twists every 6th row, you work 1×1 rib with cable twists every 6th row. The ribbing naturally contracts to appear like a normal cable on each side, which makes a great look for edging.

_MG_4559

Double-sided cables and pockets

I learned how to sew on pockets using mattress stitch, which makes the knitting look nearly continuous. For pockets, the seam is a bit obvious because of the extra bulk from the edge of the pocket that gets trapped in the seaming operation. I think I did a pretty good job of making the two pockets symmetric and secure. This was also my first project with full-length arms, so I was pleased that they look pretty good and seem to be the same length (whew!).

The last new technique I learned was sewing buttons on with backing buttons. This one kind of blew my mind. Essentially, if you sew single buttons to a knit piece, they can pull on the fabric and cause it to deform and droop. Backing buttons are tiny buttons that go on the inside of the piece at the same place as the functional buttons. You simultaneously stitch the two buttons on, sandwiching the knit fabric in between. The two buttons hold firmly against each other so the knit fabric doesn’t get pulled at all. It seems to be easiest if the buttons have the same number of holes. I chose decorative pearlescent buttons for the front, and simple two-hole white buttons for the backing. I was really pleased with how this finishing detail turned out – no drooping fabric here!

_MG_4565

Backing buttons

Overall, I am happy with the finished product. There are a couple things I would do differently in the future, though. My row gauge always tends to be a bit different than the pattern calls for, so I have to improvise to get the right size. In this case, the garter ridge details at the top ended up being a little higher up than I would have liked, so I would shift them down. It was hard to tell while knitting. The sleeves are a little tighter than I expected, so I would consider adding a few stitches in the upper arm. And finally, I think I would sew the pockets a little farther out from the center – but I’m not going to rip them out and try again! I will enjoy wearing this soft, beautiful cardigan throughout the spring.

_MG_4558

Loving my new cardigan!